Header and Footer Code - How to Count Your Website Visitors
Footer Code
To see how many website visitors you have, you first need to make your own Google Analytics account. Go to the Google Analytics homepage and in the top right corner it will say that you can either Sign In or create an account. If you don't already have a Google Analytics account, click the create an account option. After doing this, you will be taken to the Google accounts sign in page. You then will sign in with your Google account (which is the same thing as your Gmail or YouTube username and password).

Google Analytics sign in page
If you do not already have a Google account, then click here for details on how to create your own. Before finalizing your site, you will be asked to give Google Analytics some of the information about you and your site (this information will be kept private). You will create your account name which will be whatever you would like to call your account. You will also include what type of site your site is, your time zone and where you live, the domain of your site, and whether or not you would like to share your website data with Google. I recommend sharing your data with Google since this will give you better information about your website from Google without releasing any of your data publicly. After completing all of the required information, you will need to click Get Tracking ID and agree to the terms.
The first box we will talk about is the Footer Code box. This box allows you to learn about your website by putting a Google Analytics tracking code on it. Google Analytics is a program that allows you to see every bit of information you could possibly want to know about the visitors visiting your website. This data includes the age and gender of the people visiting your site, where they live, how engaged they are in your website, and how often they return. This data can offer you tons of information that you can use to help increase your website traffic. By putting this code into your website (which doesn't take any coding experience at all), you will be able to target your website for the type of people you want to bring to your site.
Once you click on this, you will be directed to your Analytics account to start setting up your tracking. If you scroll midway through the initial page Google brings you to, you will see a box with code in it and above the code, the website will say "This is your tracking code. Copy and paste the code into the code of every page you want to track." You will then need to copy this code and go back to the settings tab on your Weebly website. After doing this, you will click on the SEO subsection, paste this code into your Footer Code box, press the save button beside it and publish your website by pressing the publish button in the top right hand corner of your website editor. Then, press the home icon at the top left corner of your Google Analytics account.
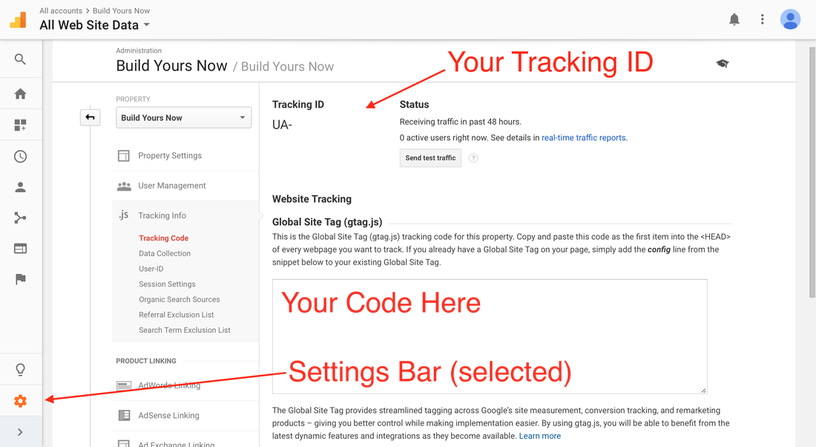
Where to find tracking code
From here, select the preferences that you would like when a window pops up asking what updates you would like. Then save your preferences, and you will be brought to the main page of your Analytics account. On this page you should see the name of your website and then an icon of a folder that says All Web Site Data beside it. You need to press this to start exploring all of the information about your website. It is important to know before clicking on this, however, that it may take a few days for your Google Analytics to start analyzing your website. For further help on your Google Analytics account click here, or you can contact me directly by going to the Contact page and filling out a form or clicking the email icon in the bottom left of the page.
Header Code
To start out making your header code, you will create your own webmaster tools account. Using your Google account, you will log into your webmaster tools account which has already been made for you when you made your Google account. After doing this, you will need to type the name of your site into the box beside the button that says "Add A Site." After doing this, you will continue to copy the meta tag (code) which Google gives you into the Header Code section of your website. To get to this, go to the blue settings button, then to the SEO subsection, and finally copy this code into your Header Code box, save it, and publish your website.
After having done this, go back to the Google Webmaster tool page and click the verify button underneath the meta tag code provided to verify that you own the website that you are claiming you own. After you do this, a message saying "Congratulations, you have successfully verified your ownership of (whatever your website domain is)" should pop up. You will then need to go back to your Webmaster accounts site dashboard and click on the Sitemaps option (the last of three options which will be on the far right side of the page). Since you are creating your site map using Weebly, you will only have to add "sitemap.xml" in order to create your own site map which will allow search engines to understand what your website is about while also improving your search engine ranking results. To see how these steps should look on the Google Webmaster site, click here.
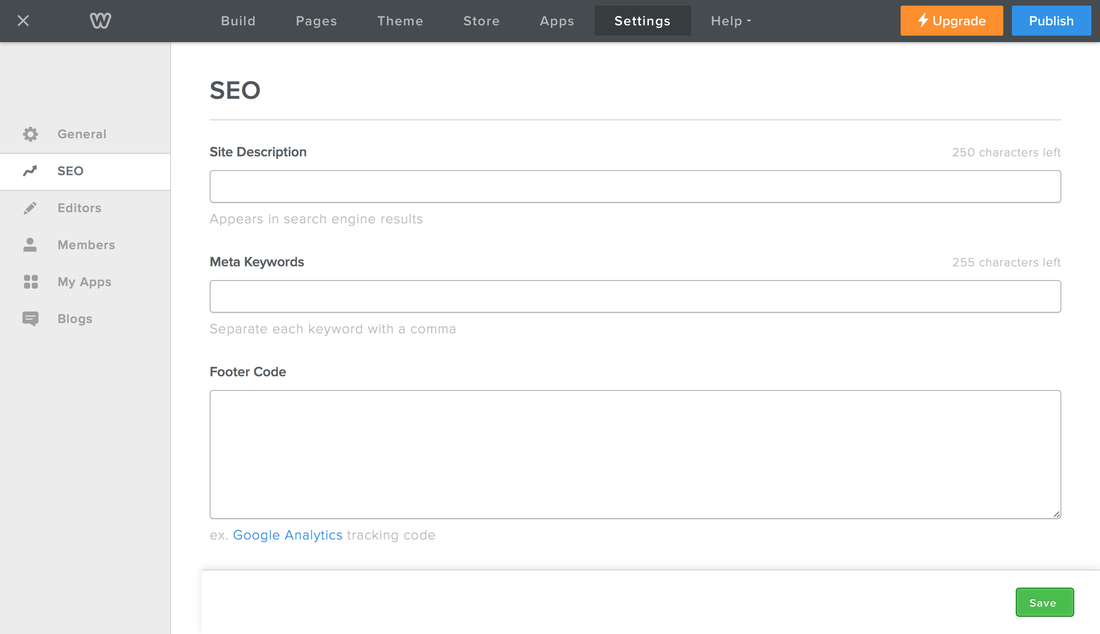
Header and Footer code in SEO settings tab
